
The Nissan Skyline GT-R (R34) is one of the most exciting vehicles Nissan has ever built. Would the old Japanese cinema monster Godzilla be a car it would be a Skyline R34 GT-R. You don’t like this phrase, neither can we read it anymore.

Before you click this blogpost away, we want to tell you that our buddy and #Speedhunter Dino Dalle Carbonare attended with his camera the installation of a KW coilover suspension with a hydraulic lift system in his R34.

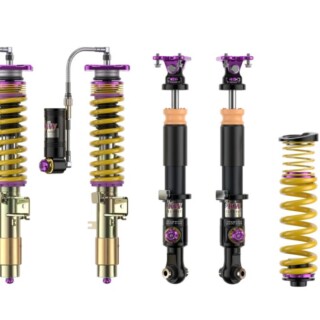
As well as for the Nissan Skyline R32 and R33, we also have different KW Coilover Kits for the Nissan Skyline R34. Unfortunately, only available without a parts certificate, and you can order these kits only as a so-called special custom-built kit and not online. Give our dealer or us a call www.kwsuspensions.net.

You see, when I got chatting to KW I told them that I’d like to have a car that doesn’t make any excuses for its setup. The Nismo S-tune kit had, up until the point of fitting the KWs, been a good compromise. They worked well for city driving, twisty roads and the occasional track outing, but I never liked how they made the car sit, especially with my red RAYS Volk Racing TE37RTs fitted.

The Skyline was a tad too high, something that came about through a safe ride height that didn’t screw up geometry too much and allowed for decent clearance. But you can’t have it all, right? Essentially, I wanted a car that could handle at its best on the street and track, but didn’t want it to be scraping all over the place because of the lowered ride height. With the BNR34 this gets even more complicated as there are a couple of aerodynamic appendages that hang off the car, namely the front and rear diffusers (for the V-spec models at least).

How could I achieve this? Simple, by making full use of the technology that’s available now, and there is much to be learned from manufacturers of high-end supercars and the lift systems they employ to momentarily bump ride height of say the front axle.

It’s the perfect solution, but it wasn’t until I borrowed Hashimoto Corporation’s Pandem-kitted R35 GT-R demo car some time back that I realized just how effective KW’s take on the whole lift dilemma really was. As the name suggests, KW’s Hydraulic Lift System (HLS) uses pressurized hydraulic fluid to expand the cups mounted on the dampers. It’s an extremely compact system; there’s no need for bulky tanks like on some air-based systems, and it’s both instantaneous and very quiet.

The fact it could be mated to the custom suspension that KW was building for was the icing on the cake. I really lucked it with the the fitting too, because aside from the cups and braided lines that make up the ancillaries of the system, the main pump/tank unit is extremely compact, meaning it it could squeeze into the only remaining bit of space in the portion of trunk where the R34’s Attesa and A-LSD modules are located, along with the battery. Kawanishi-san made up a custom bracket and in no time the pump assembly was secured in place.

This section of the trunk is normally hidden away by a massive vertical steel plate which makes up the fake back of the space, so not only was there room for the pump/tank but it’s totally hidden away too. This perfectly fits one of main themes for the upgrades I’m making to Project GT-R: keeping it looking as stock as possible and hiding stuff that just doesn’t need to be shown. While I was shooting in the trunk, I thought I’d grab a shot of the R34’s yaw sensor mounted in the very center. Yep, it’s made by Mitsubishi, so I wonder if it’s the same item that was used in the Lancer Evolution VI?

And so we move onto the install itself. Now, truth be told, Kawanishi-san did his best to make full use of the time the car was at his shop, which meant doing parts of the HLS installation while I wasn’t there.

Before my next visit he had already securely mounted the 2-way split valve underneath the car, cut the braided hydraulic lines to length, and added the fittings.


Kawanishi-san had also run the longest bit of line from the pump, right alongside the brake lines that run under the car.

These continue all the way to the front where a valve splits the flow of fluid to the left and right HLS cups.

The remainder of the work would entail cutting the lines to size and adding the required fittings to connect everything up.

With no time to waste, Kawanishi-san got cutting!


All the parts for the install were included in the HLS fitting kit – we just had to add around 50cm of extra line to ensure that it would all be laid out as cleanly and neatly as possible. Kawanishi-san’s expertise here definitely made the difference; he fits KW HLS systems to many imports including Porsches and Audis, so he can do most of the work with his eyes closed.

Here you can see a coupler attached to one of the front cups. One thing that you will probably be wondering is if the extension of the cups would impact on damping performance, and the simple answer to that would be no. That’s because when extended there is no compression of the cylinder unit, nor a change of spring rate.

The roots of hydraulic lift systems also come from motorsports; at the end of the ’90s when DTM/ITC race series cars required a hydraulic lifter, KW adapted this technology further for street use to have a hydraulic lifter bump ride height by 45 mm.

A wider shots shows you the line dropping down from the damper.

The following step is when those handy zip-ties with the metal grip fasteners come into play to secure the lines tightly against the inside of the wheel arch. And don’t worry, once the wheels with chunky 295-section tires were fitted back on clearance was checked at both the left and right bump stops.

The line then gets pulled towards the splitter valve, ensuring that you’ve allowed enough slack for it to then be secured with more zip-ties.

Here you can see Kawanishi-san adding a little mark to where he needed to cut the line.

Once cut, the outside plastic sleeve is trimmed to allow just enough of the metal braided mesh to be pulled back and revel the inner rubber hose.

The fitting is added and then tightened in place.

I loved how Kawanishi-san even cleaned up the two lines leaving the trunk room, using a rubber grommet to seal them through a factory hole.

While air systems use, err… air, hydraulic systems use hydraulic fluid or oil. In the case of KW’s system, Ravenol TS32 is included as part of the package.

Not wanting to make a mess, Kawanishi-san unbolted the bracket that holds the pump/tank in place, moved it onto a meal tray and positioned it flat on top of the space saver so he could fill the tank properly.

I didn’t really think much about it at the time, but it was cool to see that he had left enough slack in the lines behind the pump to allow for its removal. I bet you if I had done this job I’d have cut them way too short and ended up in a bad situation.

Thankfully, I didn’t though. The tank was filled up to the top and then the ignition switched on.

And now we move into the cabin, where the underlying simplicity of the HLS system stretches to its control. To operate it there is only one button: you press it to lift the car and you press it again to drop it. There’s also a speed sensor which recognizes when the car is travelling at over 80 km/h and drops the car automatically. A few test runs and both ends of the car were rising and dropping without issue, and there was only a faint buzz from the pump in the trunk during operation.

Before anyone addresses the button situation, let me explain why I had Kawanishi-san leave it unmounted in the coin tray. Nakamura-san at Worx Auto Alarm will mount it in due course, as right now we are trying to come up with a cool fitting arrangement with another button I’ll be installing. I thought it would be better to be done at the same time.

With all systems go, it was time to finish up and refit the parts that had to be removed for the install.

This included the massive steel trunk separator which I mentioned earlier, something that’s fixed in place by a ton of bolts.

And then the V-spec’s instantly recognizable pièce de résistance, the rear carbon diffuser.It’s something that for me has always defined the R34, but boy is it a big pain the behind when you need to do something under the car. Same with the front, which is actually made of cheap ABS plastic so is continuously splitting along the main fuse line.

But thanks to that gearbox lift, it was all positioned and secured in around a third of the time it usually takes me with nothing but a jack.

The above image is GIF so you’ll see the KW HLS system doing it’s thing, which is essentially a 40mm bump in ride height. It will be enough to tackle the occasional hard-to-clear ramp, and even help me get the car into its parking spot next to my house.
By throwing technology like this at the good old R34, you’re definitely are able to have the best of two worlds. Now, to start enjoying the benefits of it all!
Images Dino Dalle Carbonare (Speedhunters.com)