
The perfect suspension for every demand is more than just a catch phrase for us, but simply the perfect description for our wide KW suspension product range. You want to be sporty on the road, then take our suspension innovations from the KW “Street Comfort”-program (KW DDC, KW Street Comfort, KW height adjustable springs, KW HLS, KW DLC air suspension) or “Street Performance”-program (KW V1, KW V2, KW V3, KW V4) – and you can’t go wrong in your everyday life driving pleasure.

Although if you’re real petrol head and don’t care about the stance business and you are a more track focused car enthusiast you should opt for our KW Clubsport coilovers, with their racing spring systems and high grade motorsport high performance damping technology from our Track Performance-program.

To ensure you are not overloaded by the purchase of a KW coilover kit, we regularly train our certified KW specialized dealer partners and in addition to product trainings, we also offer driving-active practice seminars for the suspension setup.

For example, we work closely together with a team of professional race drivers for our dealer training courses. Besides to the Sachsenring, we are also regularly on site at the driving dynamics training facility in Obermehler (Germany), to actively help our KW dealer partners facilitate how to adapt a KW Clubsport coilover suspension.

Before you ask yourself if you have to adjust your KW coilover kit after installation, you can relax. All of our suspensions have a vehicle-specific basic setup – even our KW Classic applications!

We even go as far as to use a different basic setup for the BMW 520i than for a KW coilover kit for the BMW M550i. Our basic setup is our recommendation for the respective vehicle in the series state.

In addition to our measuring and test drives on country roads, highways, and the Nordschleife, we also always use our 7-post rig.
In the YouTube video above, Sidney Hoffmann was on site, when we made the first adjustment drives with our new KW DDC ECU coilovers for the BMW M2 (but it’s only German. Mea culpa).

Although before you make your first trip with the KW coilover kit, make sure that you get a wheel alignment at your KW specialized dealer directly after the suspension installation so they can adjust to the recommended camber angles values of your vehicle.
The way to the right suspension setup – the procedure and goal of the setup work

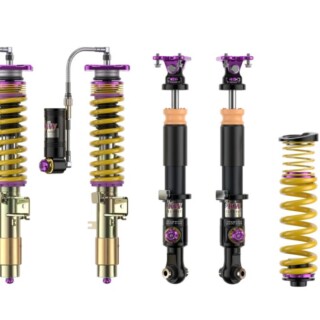
Before you now turn wildly on the adjusting wheel on your KW Street Comfort, KW Variant 2, KW Variant 3 (top on the picture, with integrated compression wheel), KW Variant 4, KW Clubsport 2-way, or KW Clubsport 3-way, please drive a few miles (500 – 1500 miles), so you get a feeling for your car. It will now drive completely different so you will have to get to know your car again.

You can also find our basic setup for the KW coilovers in the installation instructions, so you can always return to our recommended KW basic setup if you are not satisfied with your chosen damper adjustment.

If one or the other drivers is not satisfied with our pre-adjusted basic setup, our experience shows to only change one parameter at the time (rebound, compression, front axle, rear axle) and test it on the track.

Grip – Balance – Control
- More grip – to maximize the tire adhesion level
- Balance – increased steering behavior and that front and rear axle harmonize
- Control – drivability, appropriated to the driving skills and the situation
What is important?

To feel, evaluate, and take influence on the driving behavior of the car in the border area by a targeted adjustment.
Rule No. 1:
- Write down everything you do and measure! (on the setup sheet)
- Write down everything you “learn” out of it!

Rule No. 2:
- Always just change one parameter at a time – this just cannot be said enough!
Rule No. 3:
- DO NOT exceed the car while testing!
- First step: tire pressure – tire temperature

Find out the right air pressure based on the tread temperature – by a repeatedly carefully correcting of the pressure.
- Tire temperature of the tread – inside – center – outside – on the blocks, measure from a short distance! Possibly correct the camber.
Rule No. 4:

- Tires – temperature profile – important: warm up the tire slowly – from the flexing of the carcass, not just melt the tread!
- At the same time, check the track values:
You can feel the toe-out? before – and toe-in? afterwards (especially the “too much” of it!). Possibly correct!
Second step: Damper setup

The basic idea: the car stands on the spring, but it drives on the damper – the damper controls the dynamic phases, spring and stabilizer the static phases.
Or according to the German Driving Bible “Sportlich und sicher Autofahren mit Walter Röhrl: High speed is responsible for the track low speed is responsible for the driver.”
First step in changing the damping setup:

- Information about the track (for example waves) first consider the rebound stage
- Information about driving behavior (for example steering) first consider the compression stage

Rule No. 5: Trial and error – courage to change – if necessary also counter test (which means, undo changes)!
Important: cyclic testing – always keep checking the tires regarding temperature and pressure!

Afterwards just use the click setting to get back to the basic setup and try another setting and drive some test rounds again. Only step by step, please, that’s actually the best advice we can give to you.

In any case, you should be familiar with all setting options, and as soon as you feel a difference in your setup, you will know in which direction you should continue to adjust your suspension the best – have fun.